For us, Print-Ready Files are setup & sized to print without additional re-formatting. We ask that you make your images:
- Exactly 300 ppi at the size you want the print
- In the Adobe RGB 1998 Color Space
- Include a color profile (Adobe 1998 is recommended)
.JPG (High Quality), .Tif, or PDF - Include any margin you want the print to have
In Photoshop, you will be able to set the size by going to Image > Image Size. You will be able to see the size of your artwork and resize it if you wish. If your resolution is not set to 300ppi, follow these next steps in the Image Size dialog.
Instructions on setting up image size in Photoshop:
- In Photoshop, go to Image > Image Size
- If the resolution is set below 300 pixels/inch, uncheck the “Resample” box
- Enter 300 pixels/inch for the Resolution.
- To enlarge the image, select “Preserve Details 2.0” in the “Resample” drop down box.
- To reduce the image size, select “Bicubic Sharper (reduction) in the drop down box.
- The image preview on the left will show you the image quality if you were to print at the size you entered. If the preview appears blurry, we suggest reducing the image size until you are satisfied with the quality.

To Export, go to File > Export > Export As, and follow screenshots below.

If you need more in-depth help/instructions for setting up your images using Photoshop, please continue down to the “How should I prepare my digital files?” section of the FAQ!
Our turnaround time is 3-5 business days depending on our queue at the time. We guarantee a 5 working day turnaround time for all our giclée printing and fine art scanning. Special substrates may take longer, and the working time period begins when we have received a final print-ready file.
Please advise that we begin print orders after we receive your payment.
Yes. We have a minimum order of $40 for first time online orders. We have a $25 minimum order per paper type. The reason for the minimum order is that we’re not setup like a self-service photo lab to do quick, small orders from a kiosk, and all of our papers are on rolls, which requires that we print enough that we don’t waste paper
Yes! First, we guarantee you will be satisfied with the quality of the print and/or scan, or we will either remake it or refund your money in full. We believe in the quality of our work and stand behind it 100%. If you are not satisfied we will either refund your money or make it right (within 30 days from when you receive the order). Please check over your scans and prints carefully when you receive them, so we can help you as soon as possible if there is a problem. NOTE: if you provided the file, with no proofing, and you are dissatisfied with how the prints look (with regards to color or clarity, because it’s not like your monitor, or because you “expected” something different), this is NOT part of our guarantee.
Secondly, we guarantee the longevity of the print. We use the finest giclée papers and Epson K3 archival inks that will last at least 100 years. If for any reason the print fades over time, we will replace it.
Some artists feel more comfortable evaluating a proof first, before moving on to final prints. This gives you a chance to review what your image will look like on our printers, and make changes if required. In some cases we can help make small adjustments to your image if required, but Editing rates may apply. Usually we ask that you make any necessary changes after seeing a proof, and then re-upload your file.
The Proofs we offer are $10 for each image, and will come in a random size between 4″x6″ and 8″x10″ (your image will be in the same proportion/aspect ratio as the final print). Proofs will be on either Matte or Semi-Matte paper, depending on whether your final paper choice is matte or gloss. Proofs are added to your Order Invoice, however once we notify you that your proof is ready, your order is On Hold until you approve the proofs. We can ship proofs to you for review – if this is an option you’d like please be sure to select it while filling out the Print Order Form (Proofs ship via USPS Priority Flat Rate, and shipping will be an additional $5.95)
Unfortunately, our proofs can’t be on a specific fine art paper of your choice, and the sizing will be random since proofs are batched with other larger print orders. If what you are looking for is a precisely formatted print on a specific fine art paper, you need to place a small test print order instead. Even though you may be using an order like this for “proofing” purposes, we will consider it a standard Print Order. For first time clients this must meet our $40 Minimum Order, for Repeat Clients it must meet our $25 minimum per paper type.
For rush orders, we charge a fee of 50% of the job cost, or more, if our printing queue allows for a rush job. This means a $100 print order becomes $150. We’ll only commit to a rush print order if we know we can meet your deadline. For large orders that require additional file reformatting, there may be additional rush charges. If you are a first time client, we may not be comfortable doing a rush order. The Fine Art Printing and Scanning process can have a learning curve, and if we have never worked with you before, starting with a last-minute rush order may do both parties a disservice.
However, there is a caveat to all this. Remember the saying, “You can have it right, or you can have it now, but you can’t have it right, now”? All of the work we do requires attention to detail, and the more we try to rush the process, the more likely quality will suffer.

If you are up against a deadline and you are ordering prints or scans at the last minute and find a problem, such as a misprint or error that we didn’t notice, then we may or may not be able to fix any issues in time for your deadline. We make our very best effort to help you because we like and respect our clients, yet we need to ask for your understanding and cooperation when it comes to “emergency printing and scanning”. We’re not Kinkos, and we’re not the fire department, but we will do our best with the resources we have.
Yes. We have a Giclée Print Order Form so that artists and photographers can upload their files for us to create fine art prints. It’s very easy to use and you can simply drag and drop your print files into the web browser, select your printing options for your giclée prints and we’ll start your order. Of course we can’t do direct color matching without the original artwork, but we will always do our best to produce a fine print.
Artists and Photographers who submit their own digital art files for giclée printing are responsible for the quality and integrity of their images. We print what we get. Although we do our best to review the file and make sure it will print correctly, digital art and photography submission is considered “as is”. We also ask that you format your files to be Print Ready, or we may add some File Setup Fees to format them for you.
If you would like a proof before ordering your final print, color proofs are $10, on either matte or gloss proofing paper. Due to our huge range of fine art and photographic papers, we are unable to offer print proofs on the final substrate, but because our system is calibrated and all our papers are profiled, the color is very consistent across substrates.
We prefer you send us print files that are 300 ppi (pixels per inch) at the size at which they will be printed. Print files can be as low as 180 ppi and in many cases will still print well. But lower than that and we may recommend the file not be printed. Please include clear instructions about what size you would like your final prints, keeping in mind resolution constraints and aspect ratio, and how much margin you want, if any for your fine art print. For example, you might say, please print my file 18″x24″ with 1″ margin, on Canson Arches Watercolor paper.
It is also very helpful if you give your print file a logical name that reflects the print, such as “dolphin-with-rainbow_18x24_1in_margin_arches.tif”. Every giclée print job we do is custom, so the clearer the print instructions, the better we can quickly print your artwork.
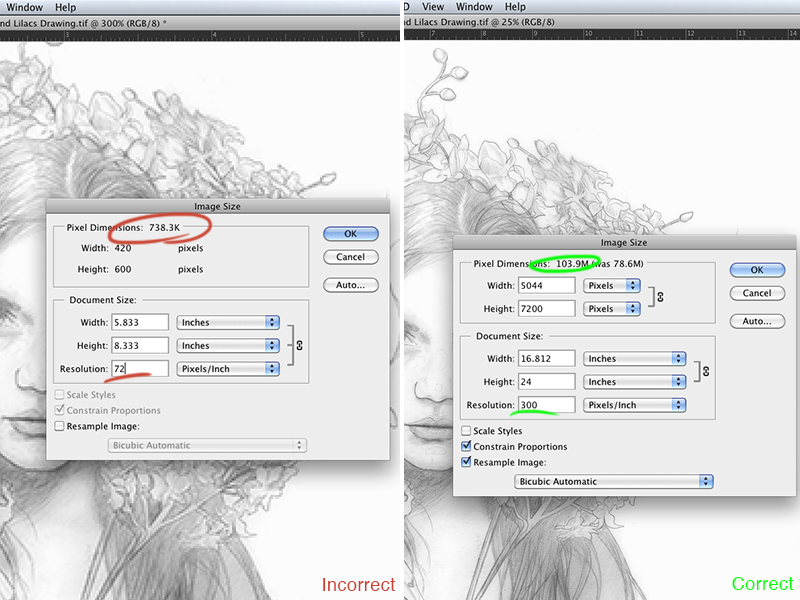
This is an example of the “Image Size” Dialogue in Photoshop showing one image that is very small and only useful for web (left) and one image that is large enough to print from (right). To check your image, look at it in Image Size, uncheck the “Resample Image” box towards the bottom, and make the Resolution 300 Pixels/Inch. Now the Width and Height will correspond to your ideal print size. Change it again to 180 Pixels/Inch to see the maximum possible print size.
We accept jpg, tif, and psd files.
We prefer high quality .jpg files, or uncompressed .tif format images. Please send flattened files and remove alpha channels.
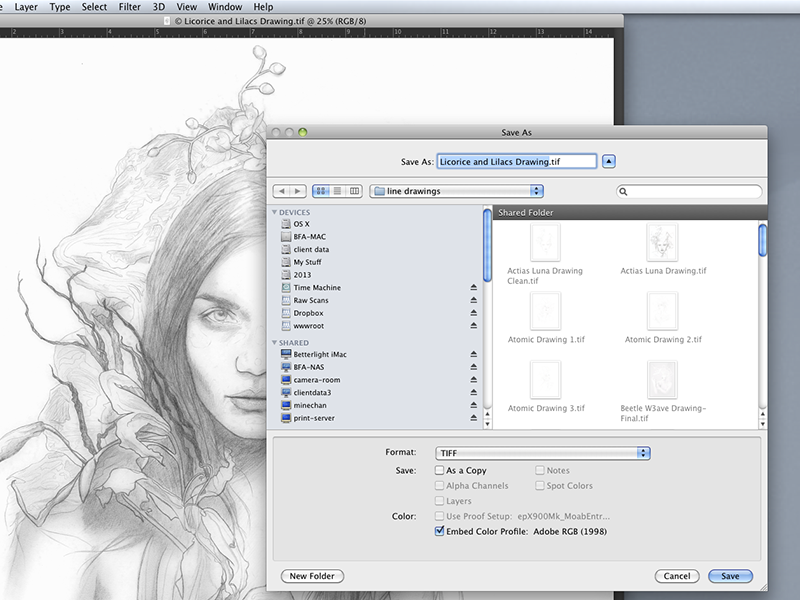
All images for printing should be saved with an embedded ICC-profile. In most cases this will be your working ICC profile. In some cases it may be derived from your camera profile (we recommend changing it to Adobe 1998). In Photoshop when you “save as” you will see a dialogue that comes up to save the image with an ICC profile, like this:
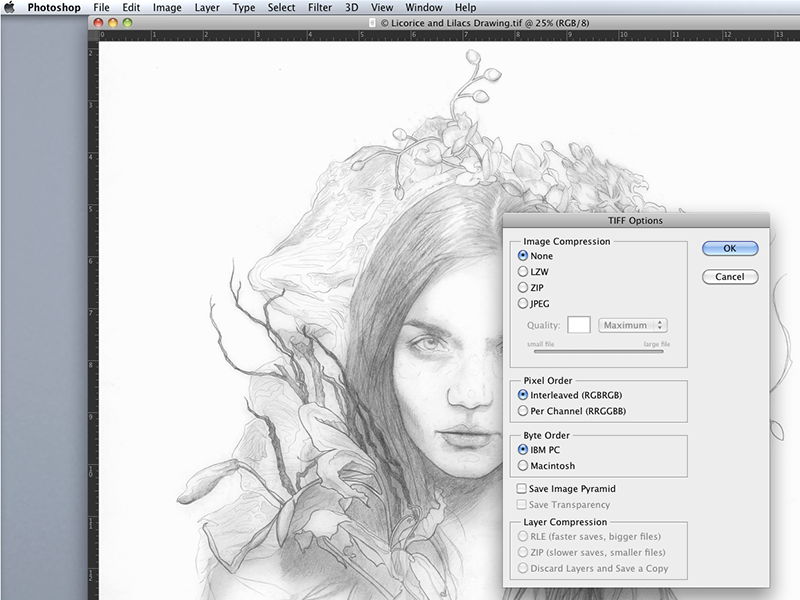
The next dialogue you’ll see (in Photoshop, other programs will vary) is the compression. Select “no compression”, and IBM byte order. This is where JPG files can yield sub-standard printed images, as JPG files compress the image, and in many cases degrade the image quality. If you can, go with TIF for fine art printing and fine art photography printing.
JPG files should be saved with Quality set to Maximum (12 in Photoshop).
Note: We will NOT print the following file formats: .bmp, .png, .wmf, .doc, .ppt., .pdf
Usually we can warn you if a file doesn’t look like it will make a good fine art print. We are not a massive online printer that goes straight to print with no human intervention. This and our overall service and attention to detail is what sets us apart from other printers. At Bellevue Fine Art Reproduction you’re actually dealing with human beings and printing specialists, and we check everything before we print.
When examining your file we will look for obvious flaws, like hairs or stains in the scan, unevenness in the sky for photographic prints, and over-all clarity and quality of image. But what we cannot predict is if the color or darkness/saturation will turn out exactly as you are expecting based on your computer monitor, because this is very subjective. Color and contrast can vary from monitor to monitor and printer to printer. Our system is set up in-house so that our monitors are calibrated to match our printers, and our scans are color corrected to match your artwork. Any images that you submit directly to us will be “as is” – meaning the color you get is what you get. If you have specific concerns, we highly recommend ordering a proof before moving on to your final print. We stand by our guarantee, but what we guarantee is our work. So we will ensure that your print is clean, all the ink is laying down correctly and there are no scratches/imperfections in the paper. But we can’t guarantee your file will produce expected results, so we cannot offer reprints if the color or value is different than what you were expecting. If there is a dispute regarding color of your files, we will check the color based on what we see on our monitors, not what you saw on yours.
The best indication of whether or not your file will make a good fine art print, especially when printing at larger sizes, is the number of pixels you start with. Regardless of what the file DPI says, it’s the total number of pixels that will make-or-break a large format print. For example, if you have a file that is 1024 x 761 pixels, it’s not going to print well beyond a 5″ x 7″ print, and there is nothing you can do to change that. Nothing. You can increase the pixels in Photoshop, but you’ll end up with something that’s terribly disappointing. If you have a file that’s 5000 x 3000 pixels, and you want to print beyond the file’s natural size limits, we can often “upres” the file to increase the number of pixels, and still get a good print. But you absolutely need a high resolution file with enough pixels to start with in order to create a beautiful art print that you’ll be proud of.
Digital artists should keep in mind that while a print can be very close, it may not be “identical” to the way the image appears on your screen. Certain colors do not exist in the color gamut of the printer, or may look different when they are not “backlit” by a monitor. When comparing your proofs to your digital “original” you should evaluate the areas that are most important to you (for example, are the darks dark enough/etc) but also consider that your print will be a new “original,” and its more important that the print shows off your image nicely than that its an “identical” match to the digital version.
Before we process your print order, we always check to make sure your image meets our standards to produce high quality prints. While we ask that images are at least 300PPI in resolution, there are times when lower resolutions will suffice, especially for smaller prints. For instructions on how to set up print-ready files, check out this page on our website. But before you go there, you will need to change the display settings on your monitor. It’s likely that your monitor is scaled-in for readability, so your image at 100% scale in Photoshop will not be the same as the actual print size. If you were to take a ruler, you might discover that an inch on your screen is much wider than what it actually is on the ruler.
Check out this article by BumbleJax that shows you How To View Your Photo At Actual Print Size In Photoshop. We often use this trick on images that are not the highest quality, but later find that it’s sufficient to print when we see it at the actual print size.
No. There are many differences that make giclée printing superior to a standard home printer. First, the large industrial printers have finer print heads, and are capable of using thicker and more varied substrates. In fact many of the top art paper and canvas manufacturers have made special paper just for giclée printers, that better hold the ink and ensure longevity and archival quality of the prints. Secondly the ink is different, and is of a much higher quality than standard printer ink. Lastly, the printers themselves are very large, allowing for printing of up to 44″ wide, with virtually no limit to the length.
For further reading on giclée printing questions, see:
Wikipedia’s article on Giclée Printing
Article on Making Giclée or Art Prints @ About.com
We use Canon Lucia Pro II inks. We always use new cartridges. We only use the best archival inks. Some giclée printers will use boxed inks and refill cartridges but we always use new factory sealed ink cartridges from reputable distributors.
One of the greatest advantages of giclée printing over lithograph and serigraphs is that you don’t have to do a full print run all at once. If you want to offer limited edition prints of your artwork, but don’t want to commit to the upfront cost of doing a large print run, then giclée is for you. The first couple of prints you sell should easily pay for the initial digitizing and printing costs, and then you can place additional orders as they are needed, without the cost or hassle of maintaining large stocks of art prints.
The initial setup costs of lithography and serigraphy are very high, and often cost-prohibitive for artists beginning their careers, or artists who only want to produce small print runs. However, if you are selling hundreds of prints at a time, then you may wish to consider lithography, and we can certainly help.
We use Epson K3 Ultrachrome archival inks and only the finest acid free substrates, so you can count on your print lasting for well over 100 years. If your print is framed and hung in a location with no direct sunlight, it will last even longer.
Virtually all mediums reproduce well using giclée, and if done well they are hard to distinguish from the original. Oil paintings with high relief and texture will not look like the original due to texture. However, most oil paintings reproduce well, as do acrylic, pencil, pen & ink, watercolor, collage, charcoal, pastel, monotype and photographic mediums.
Beware of silver, copper and gold! Some colors will not reproduce well, or at all using the giclée print process. Although giclée printing has a wider gamut than four plate lithography, certain colors can’t be produced with a printer. Things like iridescent colors, duo-chrome, and fluorescent colors are out of the printer’s gamut. Another way to think of it is non-natural colors.
Metallic paints are also problematic and can’t be reproduced, as they represent the reflective properties of a metallic element, as opposed to a color range. Any silver, gold, copper, or metallic car paints won’t reproduce well at all, and should be avoided.
No. This should be explained in the previous question, but we’re getting this question a lot due to increased availability of iridescent paints. If we do reproduction work and your image includes iridescent paint, then you will get whatever color the camera sees when the work is perfectly perpendicular to the artwork. We have samples in the studio of paint chips and paint samples that we’ve scanned and printed that show exactly what an artist can expect with certain types of specialty paint or glitter.
Many artists choose to embellish their giclée prints by hand with gold, silver or iridescent paint to re-create the look of these pigments in the final print. This can look very beautiful, and gives your prints a unique one of a kind quality, but depending on the level of detail it can be time-consuming too. While we usually recommend that artists embellish their own prints for the sake of authenticity, it is something our studio can offer as well for certain projects. You can see a video demonstration of some embellishment techniques here.
If you’re still confused about why iridescent pigments can’t be scanned or printed, a little science lesson might be helpful. First, it’s important to understand what iridescent is; it is an optical phenomenon characterized as the property of surfaces in which hue and reflection changes according to the angle from which the surface is viewed.
Iridescence is caused by multiple reflections from multi-layered, semi-transparent surfaces in which phase shift and interference of the reflections modulates the incident light by amplifying or attenuating some frequencies more than others. 1
From a physics standpoint this is rather uncommon behavior, and in man-made objects this is usually only found in paints that are specifically designed for this effect. Therefore, iridescent behavior is the behavior of a special property not found in regular pigment or dye based inks. Also, because the apparent image changes with the angle of observation, iridescence is not fully reproduced by conventional photography.
Once we have your files and have completed a round of prints, we recommend that you re-order from these print-files for future orders of these images (rather than sending us new files of the same images each time.) We will keep your files on our local servers, and do not need you to re-send them each time you order.
The reason for this is that once we have the files here and know that they are printing to your satisfaction, they should look exactly the same each time you order. But whenever we receive a new version of the same file, there’s a chance something could change (either something about the file may have been accidentally altered, or something can occasionally go wrong with the upload). If you send us new files every time you order, its difficult to create consistent print runs. The best way to place re-orders is to send us a list of the exact images you would like to re-order. For example, “Kittens-in-space-8x10print.tif” and “Godzilla-baloon-11x14print.jpg” Additionally, you can send reduced size jpgs of the images you are re-ordering so we can be clear which ones you’d like to re-print.
We promise to keep your Scan files for up to 2 years. This is our liability disclaimer (although we make no claim for liability for loss of your files if you lose your copy).
However, as of 2018 we have over ten years of files, and have never discarded any of our digital Scan files. We have off-site backups as well, so chances are pretty good that your files are safe with us no matter how long it’s been.
Clients are advised to keep a copy of their files and treat them as you would other valuable electronic documents, photos or heirlooms. Replacement CDs or DVDs and file recovery if you have lost your copy are $10.
This is a question of great debate, and you will get different answers from different people. But in general, a 300 ppi file will produce excellent results. A 270 ppi file will produce very good results. A 150 ppi file will produce acceptable results depending on the subject matter. As for file size, the size of the file in megabytes will depend on the amount of detail in the file, the amount of color and the color depth. What is really important is that you pay attention to the DPI, or PPI (dots per inch, or pixels per inch).
So for example, if you have a file that is 3000 pixels by 2000 pixels, then it will print with excellent results at 10″ x 6″. A good 8 Mpixel camera like the Canon 20D will produce a file that is 3504 x 2336 pixels, and you can make fine prints of up to 20″ x 16″. In that case you will be printing at 175 dpi, and that’s about as high as you can really go with that format and still have it look good and crisp. But fine art is usually more demanding, and if at all possible we would prefer to print images within the 240 to 300 ppi range. Anything lower than that and you’ll often get quality degradation.
But there are other factors as well, such as file compression and bit depth, all of which go far beyond the ability of this FAQ to explain. In short, scans or photographs of artwork should be 300 ppi with at least 8bit depth, and should be saved as TIF, or JPG with no compression. In the best of all worlds your file will be 300 ppi at the size you want to print. The better the art capture, the better your giclée prints will turn out.
File Resolution Chart
The table below shows an image resolution chart to help you understand at what size your digital image can be printed and still get good results. Optimal printing occurs at 300 ppi (pixels per inch). 150 dpi usually yields good results. At 72 dpi we can’t guarantee that the image will yield an acceptable print. While most online print operations will print this for you, we will evaluate the image and warn you before printing.
| Print Resolution | Fair (72 dpi) | Good (150 dpi) | Excellent (300 dpi) |
| Dimensions (width or height) | Number of Pixels | ||
| 5″ | 360 | 750 | 1500 |
| 6″ | 432 | 900 | 1800 |
| 7″ | 504 | 1050 | 2100 |
| 8″ | 576 | 1200 | 2400 |
| 9″ | 648 | 1350 | 2700 |
| 10″ | 720 | 1500 | 3000 |
| 11″ | 792 | 1650 | 3300 |
| 12″ | 864 | 1800 | 3600 |
| 13″ | 936 | 1950 | 3900 |
| 14″ | 1008 | 2100 | 4200 |
| 15″ | 1080 | 2250 | 4500 |
| 16″ | 1152 | 2400 | 4800 |
| 17″ | 1224 | 2550 | 5100 |
| 18″ | 1296 | 2700 | 5400 |
| 19″ | 1368 | 2850 | 5700 |
| 20″ | 1440 | 3000 | 6000 |
| 21″ | 1512 | 3150 | 6300 |
| 22″ | 1584 | 3300 | 6600 |
| 23″ | 1656 | 3450 | 6900 |
| 24″ | 1728 | 3600 | 7200 |
| 25″ | 1800 | 3750 | 7500 |
| 26″ | 1872 | 3900 | 7800 |
| 27″ | 1944 | 4050 | 8100 |
| 28″ | 2016 | 4200 | 8400 |
| 29″ | 2088 | 4350 | 8700 |
| 30″ | 2160 | 4500 | 9000 |
| 31″ | 2232 | 4650 | 9300 |
| 32″ | 2304 | 4800 | 9600 |
| 33″ | 2376 | 4950 | 9900 |
| 34″ | 2448 | 5100 | 10200 |
| 35″ | 2520 | 5250 | 10500 |
| 36″ | 2592 | 5400 | 10800 |
| 37″ | 2664 | 5550 | 11100 |
| 38″ | 2736 | 5700 | 11400 |
| 39″ | 2808 | 5850 | 11700 |
| 40″ | 2880 | 6000 | 12000 |
| 41″ | 2952 | 5904 | 11808 |
| 42″ | 3024 | 6048 | 12096 |
| 43″ | 3096 | 6192 | 12384 |
| 44″ | 3168 | 6336 | 12672 |
We scan artwork generally at 300 ppi, sometimes higher if it’s going to be a billboard or something, but certainly not crazy high resolution like 1200 ppi. There may be a time we’ve scanned vintage postage stamps at 1200 ppi, but that was a rare exception. Artwork is usually scanned at 300 ppi, and book pages are often scanned at 600 ppi.
Slide scans and transparency scans may be the exception to this. With slide and transparency scans, or negatives, scans may be as high as 4800 ppi. This is because an analog slide will hold information for many inches or feet, and has been reduced as very high resolution onto a transparent film that is then traditionally used with an enlarger for printing. So a one 48″ painting captured with a 35mm camera will produce a slide that is about an inch wide. In this case, scanning the slide at 4800 ppi will still only give you 100 pixels per inch of the original painting. The same is true of medium format camera and large format camera slides, glass plates, tin plates etc. </p?
But this is all very different than scanning an original physical document, like a paper document, or a painting or drawing. Unless the detail is microscopic, like a postage stamp or currency, then resolutions above 300 ppi are rarely necessary.
People often confuse input resolution (pixels per inch) with device output resolution (DPI or dots per inch). An output device like a printer takes the input image (PPI) and outputs that at an output resolution (DPI) of 1200 DPI or more. Our printers print 2400 and 2800 DPI, or dots per inch, so the dots overlay each other and create a seamless image that doesn’t show dots, but continuous color. In other words, the output device translates the PPI from an input file, to DPI for an output file. And herein lies one of the most common misconceptions and confusions about resolution. Often times we get corporate work where someone has insisted on a “600 DPI or 1200 DPI scan”, and we know that the person has been given the wrong specs, and their boss or client has confused input resolution with output resolution, and as well they’ve confused PPI with DPI.
PPI vs DPI: input resolution vs. output resolution
There is a great in-depth article on Wikipedia regarding PPI and DPI, and input resolutions vs. output resolutions. If you want to read more, click here.
We print on art papers, photo papers, and canvas. Everything we have is archival, including our proofing paper. Although brands may change due to availability or quality issues, we keep the following categories of media in stock: photo papers, art papers and canvas. We have a huge stock of papers and canvas to choose from. In fact, we probably have one of the widest selection of papers and canvas to choose from that you’ll find on the Internet. We love nice fine art papers and canvas, and spare no $$ when it comes to our substrates. For more detail see our Papers and Canvas page.
“Banding” is when a print displays faint inconsistent horizontal lines or stripes, especially in areas of solid color or smooth color-gradients. It can be caused by an issue with a printer, or by an issue in the file. Many larger print retailers don’t have a high-bar of quality control, and don’t perform regular maintenance on their equipment. So often, artists will receive prints displaying faint banding in their prints when using this type of discount printer (we see it at almost every show or convention where prints are sold.)
Our studio meticulously maintains our printers, and we perform regular cleanings meant to prevent this type of issue. When a print displays banding in our studio, the first step we take is to check all of our equipment, and make sure everything is working correctly. If after all of these cleanings, the print still produces banding, it means that the issue is in the file and not the printer. (Note that banding can be very subtle, and often will only be noticeable when examining the print very closely, and may be acceptable at normal viewing distances).
When we notice banding in a print, we will stop your order, and alert you to the problem with your file. Unfortunately, it can be difficult to pinpoint what is causing specific banding, and there is only so much we can do to help. But here are a few common causes that may help you create a new file that will produce a better print.
1) Banding often happens in dark or neutral areas of an image, black, grey, or sometimes sky blue, where there is a very subtle gradient. Keep in mind that while the background may look black or solid to the human eye, what we have here is a very subtle gradient. Skew the levels of the image extremely towards black or white, and see if the lines become visible on screen. If they do, those areas actually have these faint striations in them, but may not be visible on screen at their normal level (yet the printer will display them.) If this is the case, you may be able to digitally re-create that gradient or color field in a way that is smoother and will print more cleanly.
2) In some cases, banding shows up on matte (RAG) paper prints, but not on gloss or semi-gloss photographic papers. If this is the case, the reason that RAG papers show this is that they have a more narrow Color Gamut than photo papers, so a paper with a wider gamut will eliminate the issue. This of course means that to print a file full size on RAG, you need a file that has very good fidelity. If we notice banding on a matte paper order, we will often recommend a photo paper instead. If the files you send us consistently have this type of banding, we may tell you we are unable to print them on RAG paper for you (or that any RAG prints are at your own risk, and we can’t replace banded ones).
4) Banding often happens on files that have been digitally enlarged, or had their resolution artificially increased. If you are taking a digital file and trying to print it at larger than its ideal native size, it may be at risk of printing with banding. This is partly due to the algorithms that increase the size of your image – they artificially estimate the information between each original pixel. This means that especially in gradient areas, pixels are in essence repeated, which can look like banding in the print. There is also a risk of introducing this type of issue each time you adjust and re-save a file. For the best quality of prints, you should create a Master file that is as close to the RAW file as possible, at full resolution. To create new print files, work from the Master file and not an already reduced size print file. With certain photographs, if we are trying to figure out why your file is banding, we may ask you to send us the original RAW file to see if the issue persists or if it was introduced at some point in the editing process.
5) In some cases, the banding may be caused by the camera and settings you are using. Consumer grade cameras especially have a limited file size, and don’t perform well in low-light conditions. For example, the Canon Rebel is a popular consumer Digital SLR, and creates files at 18MP at full resolution. This means that if you don’t crop the image at all, and take it straight from the camera, you’ll have an image that’s 17.28″ on the long side at 300ppi. But if you crop/zoom into an image, the remaining file size decreases. So keep in mind how much you are manipulating and cropping your files, especially when trying to print large. Other things that can contribute to noise, or grain, which can cause the banding on RAG papers, is the ISO and shutter speed. When shooting at higher ISO (beginning between 400 to 800) or low shutter speed (below 1/30th of a second), the resulting prints can display noise in the form of banding. All of this means there can be cases where a well exposed natural daylight image from your camera prints great at a larger than native size, but a dark image from the same camera does not, based on all of these factors.
Our recommendation for sending us a new file after we’ve encountered banding is to re-export the Native Resolution Files as a 16bit TIF (no compression, Adobe 1998 colorspace), instead of an 8bit JPG. Then re-create any edits you made as non-destructively as possible (every color adjustment layer, filter, or selective darkening or lightening can contribute to risk of banding.) Save your print file as a 16bit TIF as well, and send it to us again. Its also a good practice to order proofs of any new images if your work has had previous banding images, and to switch to a photo-paper if they have happened on RAG prints. We realize that it can be a very frustrating issue, especially because sometimes the cause is impossible to determine. But by the time we even alert you to a banding problem, our small team of professionals has already done some extensive troubleshooting to try to print your file cleanly, and sadly we can only resolve it in some of the cases where it occurs.
Do you have an iPhone photo that you want to upload to your computer? Click HERE to watch a video that shows how you can transfer your photo from a iPhone to a PC.